

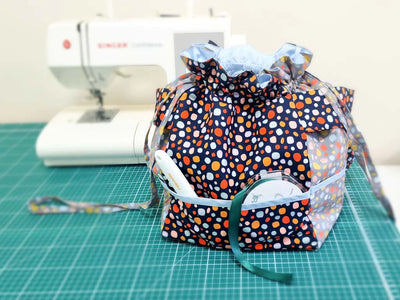
Reversible Lantern Shaped Lunch Bag

This lantern shaped lunch bag has lots of space inside, it is semi structured, machine washable and reversible! The box and knife pleats create a beautiful shape. The finished bag is 15cms deep and at it's widest point has a circumference of 84cms. What's not to like?
I chose a rainbow theme for the outside of my lantern bag as we just received some beautiful Lewis & Irene Bumbleberries fabrics in the Fabric Love shop. The pastel shades work well together and are framed by the neptune blue fabric. I wasn't too sure what to do for the inside but I was working in in my studio when the sun came out to a beautiful blue sky. Decision made.
I made my own bias binding so it matched the rest of the bag, it's not as hard as it sounds as I have a handy little bias binding tape maker for this!
You Will Need:
- A fat quarter bundle containing six coordinating fabrics
- An extra fat quarter for the handles and outer bag
- Heat & Bond Fusible Fleece - Half a metre
- Bias Binding - Half a metre.
- Sewing machine
- Iron & an ironing board
- Sharp scissors or a rotary cutter, pins, heat erasable pen, ruler, corresponding coloured thread
Cutting Out:
You will find it easier to make this bag if you cut all of the pieces out first and put them into inner/outer piles. These need to cut accurately because they have to fit snuggly inside one another, it might seem a chore but I promise it is a much smoother process! Just take one section at a time.
Outer Bag
- Heat & Bond - Cut six pieces measuring 9x23cms
- Cut six different coloured rectangles measuring 9x23cms.
- Cut six matching rectangles measuring 7x23cms
- Cut one circle measuring 14cms in diameter (circumference 44cms)
- Heat & Bond - Cut one circle measuring 14cms in diameter (circumference 44cms).
Inner Bag
- Cut 2x3 different coloured rectangles measuring 9x23cms.
- Cut 6 matching rectangles measuring 7x23cms.
- Cut one circle measuring 14cms in diameter (circumference 44cms).
- Heat & Bond - Cut one circle measuring 14cms in diameter (circumference 44cms).
Bag Handles
- Cut two rectangles measuring 55x5cms. I used the navy fabric to match the outer panels and the bias binding.
- Heat & Bond - Cut two strips measuring 55x2.5cms. I used bits of left over Heat & Bond, small pieces can be patchworked in and it doesn't show on the outside of the handles. I don't do waste!
Instructions
The seam allowance is 5mm or 1/4 of an inch. This may seem small but you would have to trim out any excess to reduce the bulk in the seams.
The Outside Bag
Step 1. Prepare your pieces
Following the instructions, press the Heat and Bond onto the wrong side of the different coloured rectangles measuring 9x23cms.
The smaller rectangles do not require interfacing, this is to ensure that they open softly when they are box pleated.
Lay the six pieces out and decide which order you would like them to flow, I started with green. Lay the smaller piece (7x23cms) on the edge right side to right side and stitch using a 5mm seam allowance.

Step 2. Sew the panels together
Open out the smaller panel and add the next coloured panel. Repeat until all of the outer pieces have been sewn together. Press the back seams on one side.
The whole panel should measure 85x23cms.

Step 3. Make the box pleats
Box pleats on the top and bottom of the fabric will help to create the classic lantern shape and provide more width in your bag.
On one long edge, starting at the left side, lift the first interfaced panel and pin it to the centre of the next un-interfaced panel.
Take the next interfaced panel (light blue) and align it to the green piece, pin in place. As you can see, the smaller rectangles are pushed to the back of the panel forming a fan shape.

Step 4.
Repeat this process for the other long edge. Your fabric should now measure approximately 55x23cms. Don't worry about the un-interfaced piece, you're going to do that next.

Step 5.
Turn the fabric right side to right side and stitch the open edges together. Press the seams to one side.

Step 6.
Turn your fabric the right way round and make your final box pleat for the outer bag.
Staystitch on the open ends of the cylinder ensuring that all of the interfaced pieces are aligned and none of the smaller, navy rectangles are peeking through.
Next you will need to do a tacking stitch (sometimes called a gathering stitch). This can be done by hand or on your sewing machine.
Tacking on a Sewing Machine
Check that your sewing machine is on straight stitch and that you are on your longest stitch length, this is usually a 4/5 depending on your sewing machine.
You will need to sew 2cms from the open edge, no backstitching! This will hold all of the layers in place and give you an aligned, clean finish when you sew the bottom into your bag.
Before you move to the next step, change your sewing machine back to it's previous settings. Yep, been there, done it, got the t-shirt...

Step 7.
Iron the Heat & Bond onto the wrong side of the bag base.
Fold the base into quarters and mark with a heat erasable pen. Repeat for the outer bag.
Align the quarter marks together and pin the bag base to the outer bag, right side to right side. Stitch.
Tip. When you are pinning a curve always pin vertically, it allows the curve to keep it's shape and gives it more flexibility. Pinning horizontally changes the shape and makes for a messy sew.

Inner Bag
Step 8.
Repeat step 1. and sew the inside pieces together. There are no interfaced pieces. Press the seams to opposite sides of the outer bag (this is called "nesting" and reduces any bulk in the seams).
Step 9. Make the Knife Pleats
The inner bag pleats are created slightly differently, knife pleats have one fold and only go in one direction, much like the pleats on a kilt. They still create the desired shape without making the outer bag appear bulky.
Lay your inner bag panel flat, right side up and starting from the left side, lift the whole wider rectangle over the slimmer piece. Align the seams and pin in place so the smaller pieces are hidden.

Step 9.
Repeat steps 4-7.
You should at this point have two bags, an outer & an inner!
Place the inner bag inside the outer and line up the box and knife pleats. Pin the two together vertically. Looking good, eh?

Bag Handles
Step 10.
Fold the fabric in half lengthways and press.
Use this line as a guide for the edge of your Heat & Bond. As you can see I patchworked pieces in, I keep scraps for this purpose (I can't throw anything away!)
Fold each edge in by 5mm, press.
Fold the strap in half, turning the 5mm pressed edge's in, stitch along both sides. Press.

Step 11.
Place the handles on the bag so they are equally spaced. The raw ends of the handles should be facing upwards towards the raw edges on the opening of the bag. Stitch in place.
Pin the bias binding on the inside of the bag (remember to pin vertically!) Stitch.
Fold the bias binding over the edge of the bag and stitch, this can be done by hand or on a sewing machine.

Step 12.
Pull the straps up over the top of the bias binding and stitch them in place. This gives them additional strength.
Finally, remove the tacking stitches from the outer and inner bag.
What are you taking for lunch? Apart from a fabulous bag...


More tutorials you might like...
View all


Leave a comment