

How to Make Easter Chicks
Project level: Easy

You will need: A sewing machine, scissors, red/yellow/orange felt, corresponding thread, a needle and your choice of fabric. I chose gingham fabric because it has a vintage yet rustic look to it.
You will also need toy stuffing or the contents of a pillow, (I use pillows bought from a supermarket that cater for students... the stuffing is the same as toy stuffing, adheres to fire safety regulation and you get more for your money... that's more money to spend on fabric and hide in your house!!)
Instructions:
First you will need to download and print the PDF pattern. Ensure you do not check the box on the print dialogue that says "Scale to Fit" or "Fit to Page" and check that the test box has printed at the correct size of 5cm.
Step 1:
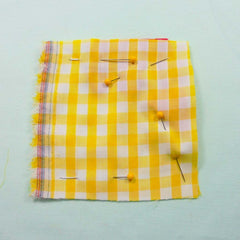
Using your PDF pattern, cut the fabric as instructed. Pin the red crest onto the top of one square.
Fold your orange square twice to make a triangle. Pin it on open side down, fold side up.

Step 2:
Pin the other square on top and stitch three edges, leaving the back open.
Step 3:
When you have done this, cut across the corners.
This is also referred to as "mitre the corners" because you are trimming the corners at a 45 degree angle. Think of a Bishops hat...
This is reduce bulk on the seams and corners.

Step 4:
Turn your chick the right way round.
Now it's starting to look like a chick!
Using a blunt pencil, crochet hook or bodkin push the corners out so they are square.
Turn the open edges in and using your thumb and finger, press along the edges (this is known as finger pressing).

Step 5:
Time to stuff your chicken! Tear the stuffing apart and push it into the corners and the body until it holds it's shape but it's also still a bit squishy.
With the beak facing forwards, pin the opening together, matching up the seams.
Hand stitch the opening together.

Step 6:
Your Chicks need eyes!
There are two ways of doing this, you can sew on two very small buttons or...
Check out our YouTube Channel for instructions on how to embroider a French Knot, which is easier than it sounds!
There is a tutorial for this here:
Now you've made a Mama Chicken, are you ready to make her Chicks?
I have successfully adapted the pattern for felt chicks and hand sewing, making it a lovely project for learners, those without a sewing machine, and children
Leave a comment